
If you have been using Family Tree Maker 2024 for a while, you would have come across the term GEDCOM file.
And if you haven’t worked with it properly yet, this is the stage where understanding it really matters more than anything because things can either go smoothly for you or completely off track.
GEDCOM files are essential when you want to share your family tree with someone else, move your data to another genealogy software program, or submit your research for review.
However, if you do not follow the correct process, particularly with media, things can break and cause many problems.
This blog will walk you through everything step by step, based on how Family Tree Maker 2024 works on both Windows and Mac, so you don’t run into any issues.
What is a GEDCOM File?
A GEDCOM (GEnealogical Data COMmunication) file is a structured text file that stores your family tree data in a way that other genealogy programs can understand. It includes names and relationships; events such as birth, marriage, and death; and notes and sources.
At the same time, it is equally important to understand what it does not store. It does not store your photos or documents but only links to them. This single detail is the reason most imports fail or look incomplete.
Before starting, make sure you have completed the Family Tree Maker Download & Install Process, as these steps require a properly installed and updated version of the software.
Exporting a GEDCOM File in FTM 2024 for Windows
Let’s start with Windows as this is where most users work:
Step 1: Open Your Tree.
Start Family Tree Maker and open the tree you want to export.
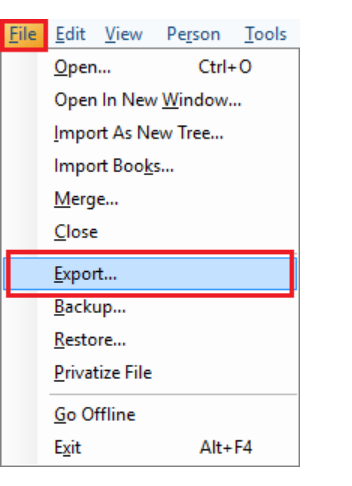
Step 2: Go to Export
Click.
File → Export
This opens the Export window.
Note: Upon opening the Export window for the very first time, you might see a password protection message for the files you are exporting. You can select “do not show this message again” if you do not want to see this message in the future.
Click Continue to proceed.
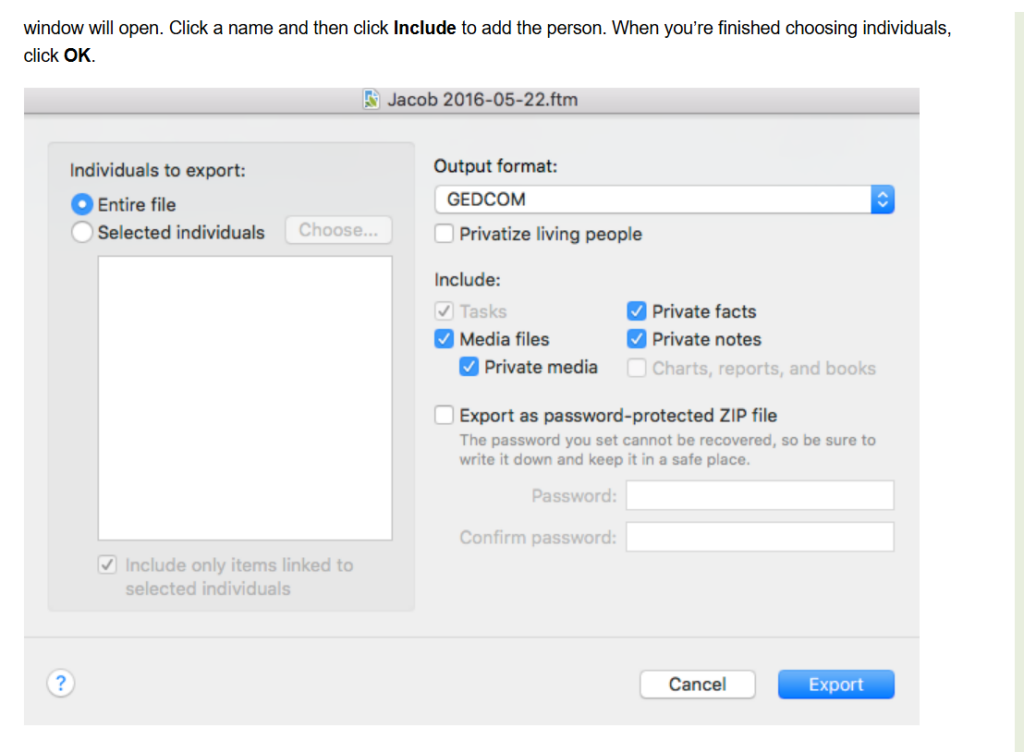
Step 3: Decide What You Want to Export
You will get two options:
Entire file → exports everything
Selected individuals → It lets you choose specific people
If you choose selected individuals, a filter window opens where you manually include people. Take your time here, as this step will determine what actually goes out.
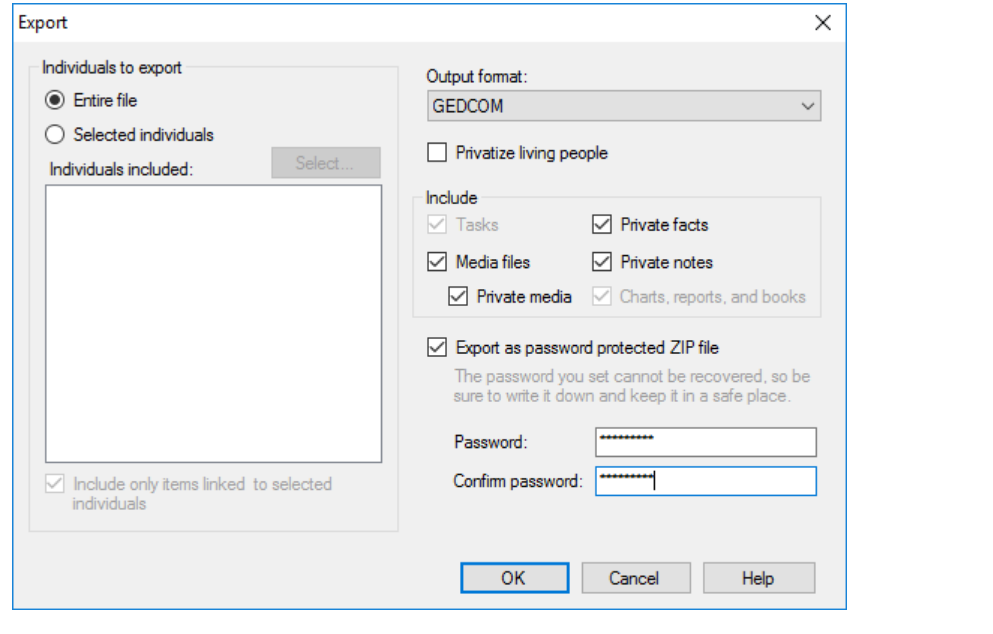
Step 4: Choose GEDCOM Format.
In the output format dropdown:
Select GEDCOM
Most people stick with the default compatibility version, which works fine across software.
Step 5: Configure the Options Carefully
This stage is where attention to detail matters. You will see options such as:
- Privatize living people: You can select this checkbox to exclude information about living individuals. It will export surnames and relationships. It will not export information such as names and facts; shared facts will not be included.
- Include private facts: By clicking on this checkbox, you will export information marked as private.
- Include private notes: By clicking on this checkbox, you will export notes marked as private.
- Include media links: By selecting this checkbox, you can easily export links to media files in your tree. If you also select the “Private Media” checkbox, it will include links to private media items.
- Include only items linked to selected individuals: By selecting this checkbox, you can export facts, notes, and links to media items that are connected to those individuals.
Step 6: Optional Password Protection
FTM may prompt you to protect your export as a ZIP file. In most cases, you don’t need this unless you are sharing sensitive data.
If you are using a password, it must be a minimum of 8 characters and contain letters and digits.
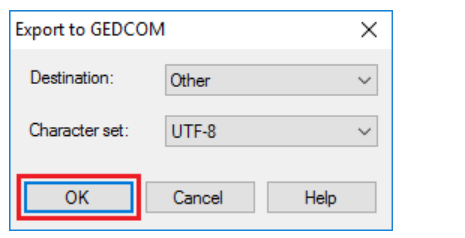
Step 7: Final Export Settings
Click OK
Then:
- Choose destination (usually “Other”)
- Confirm settings
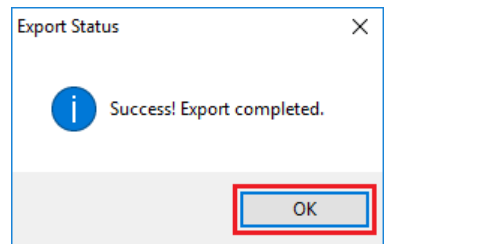
Step 8: Save the File
- Enter a name
- Choose where to save it
- Click Save
You will now see confirmation once it’s done.
Importing a GEDCOM File in FTM 2024 for Windows
Now let’s bring data back into FTM.
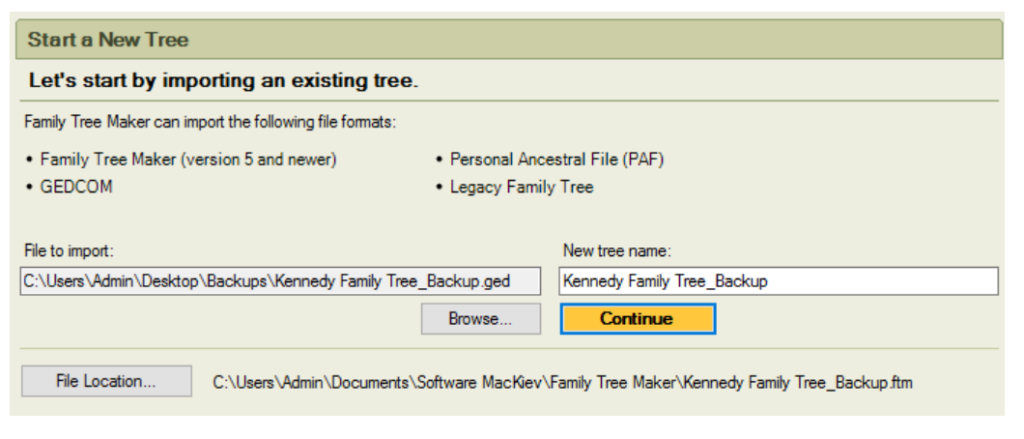
Step 1: Start Import
Click:
File → Import as New Tree
Step 2: Select File to import
Click “Open.”
Step 3: Name Your Tree
Enter a name and click Continue
Step 4: Import Settings
You may see a character set option. In most cases, leave it as default.
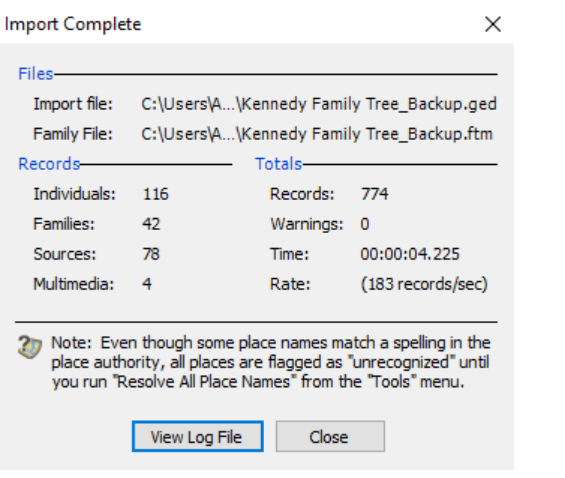
Step 5: Complete Import
A progress window appears. Once done, click Close. Your new tree opens automatically.
Exporting a GEDCOM File in FTM 2024 for Mac
Now, Mac users, this is where you will notice differences. The process is similar, but the interface wording is slightly different.
Step 1: Open Your Tree
Launch FTM for Mac and open your tree.
Step 2: Go to Export
Click:
File → Export

Note: Upon opening the Export window for the very first time, you might see a password protection message for the files you are exporting. You can select “donot show this message again” if you do not want to see it in the future.
Step 3: Choose Scope
Select what you want:
- Entire file
- Selected individuals
Step 4: Select the GEDCOM format
Choose the GEDCOM format from the dropdown.
Step 5: Review Export Options
Mac includes following export options:
- Privatize living people: You can select this checkbox to exclude information about living individuals. It will export surnames and relationships. It will not export information such as names, middle names, and shared facts.
- Include private facts: By clicking on this checkbox, you will export information marked as private.
- Include private notes: By clicking on this checkbox, you will export notes marked as private.
- Include media links: By selecting this checkbox, you can easily export links to media files in your tree.
- Include only items linked to selected individuals: If you select this checkbox, you can export facts, notes, and links to media items that are connected to those individuals.
The functionality remains the same as Windows; just the wording is slightly different.
Step 6: Password Option
If you want to use the password option, check the Export as password-protected ZIP filecheckbox, and then enter and confirm the password you want to use.
Click: Continue
Step 7: Export
Here’s the key UI difference:
On Mac, you click Export, not OK.
Step 8: Save File
- Name your GEDCOM file
- Choose location
- Click Save;
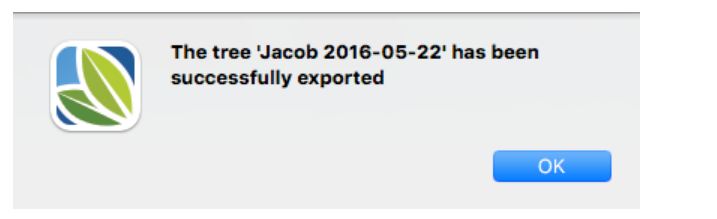
Export completes with confirmation.
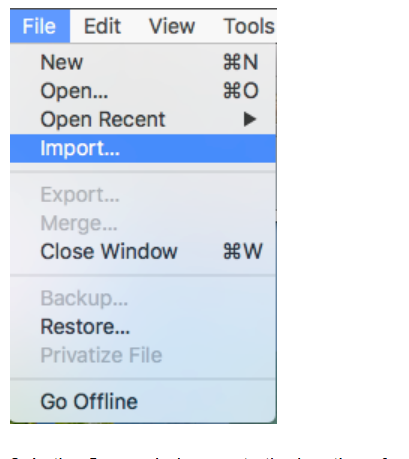
Importing a GEDCOM File in FTM 2024 on Mac
The steps are similar to importing a GEDCOM file on Windows but the wording used is slightly different.
Step 1: Start Import
Click:
File → Import
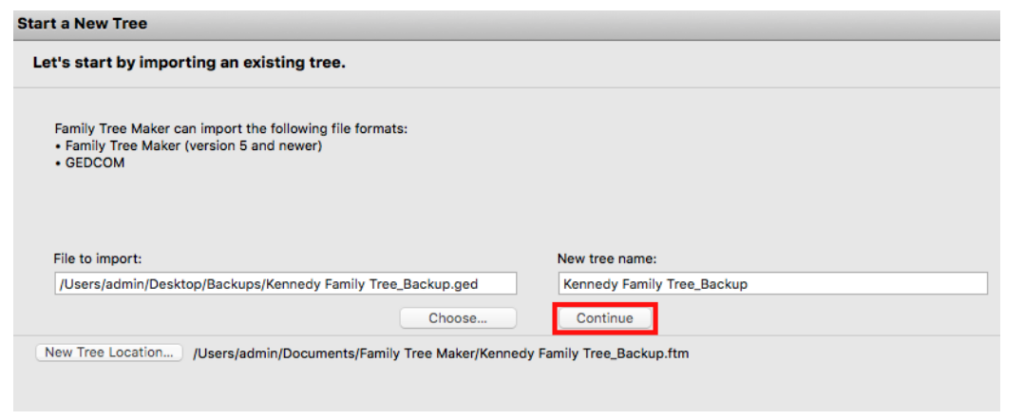
Step 2: Select File
Choose your GEDCOM file and click Open
Step 3: Name Tree
Enter a new name for the tree and click Continue
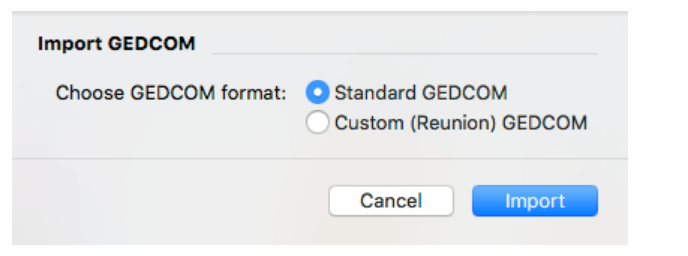
Step 4: Import GEDCOM Dialog
Select format and click Import
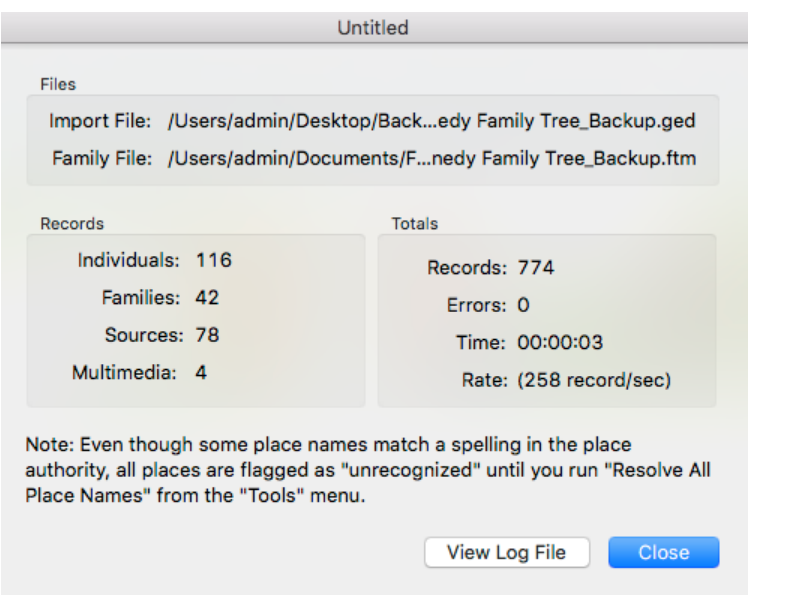
Step 5: Finish
Wait for completion and click Close.
Your tree opens automatically.
The process of exporting and importing GEDCOM files in Family Tree Maker on Windows & Mac is largely similar, with only small interface differences.
Media Handling
Most new users and even experienced ones often make mistakes in this area.
GEDCOM files only store links to media, not the files themselves. So, if you send just the GEDCOM file, photos won’t show, documents won’t open, and your tree looks incomplete.
Before exporting the GEDCOM file, make sure the number of media items in the Media workspace matches the number of files in the Media folder.
If the numbers don’t match, copy everything into the Media folder and re-sync inside FTM.
When Moving to Another Computer
When you are moving to another computer, always make sure that you also move the GEDCOM file and media folder. Both must be transferred together, as this step is not optional.
Common Problems You May Face
Even when you follow the steps, issues can still come up. You may see your photos are missing. It might happen because the Media folder wasn’t transferred. You can also find broken links; it happens when file paths change between computers.
Occasionally, you will notice missing notes or facts, and it happens because of unchecked export options.
At times you may see some strange characters and the reason behind this can be an encoding mismatch during import.
Truncated text can also be an issue, and this might arise because some programs don’t fully support long notes.
Always Check Your Data After Import
People usually skip this step, which can be a big mistake. After importing your data make sure you always go through the following:
- Names
- Relationships
- Dates
- Notes
- Sources
- Media
Even official guidance recommends verifying everything after transfer.
How Can Family Tree Makers Support Help You?
If you are working with large trees, support becomes crucial. Family Tree Makers Support can help you with import/export errors, broken GEDCOM files, missing media issues, compatibility problems and data recovery.
You can connect with them if your import fails repeatedly, your family tree data looks incorrect, media doesn’t reconnect, or you see unexpected errors that you are unable to understand or resolve on your own.
Best Practices To Follow
If you want smooth transfers every time ensure you follow the following:
Before Export
- Clean your data
- Standardize dates
- Check media
After Export
- Test the GEDCOM in another software
Before Import
- Keep a backup
After Import
- Validate everything immediately
Final Thoughts
GEDCOM is extremely useful but only if you treat it correctly.
It’s not a full backup and it’s not foolproof. But when used properly, it’s the easiest way to move and share your Family Tree Maker on Windows & Mac.
Always moving your Media folder along with your GEDCOM file can save you a lot of problems and assure smooth import and export on both Windows and Mac.
Frequently Asked Questions
1. Does a GEDCOM file include photos and documents?
Answer: No, a GEDCOM file only stores links to your media files, not the actual photos or documents. It is important to transfer Media Folder along with GEDCOM file to assure images remain intact.
2. Why are my images missing after importing a GEDCOM file?
Answer: This usually happens because the Media folder wasn’t copied along with the GEDCOM file.
3. Can I export only a part of my family tree in FTM 2024?
Answer: Yes, you can do that by clicking only on the selected Individuals option while exporting.
4. Is a GEDCOM file the same as a full backup?
Answer: No, a GEDCOM file is used only for the data exchange. For full backups, you should use Family Tree Maker’s built-in backup feature.
5. Why are some facts or notes missing after import?
Answer: It happens if certain options, like private facts or notes, were not selected during export.
6. Can I use the same GEDCOM file on both Windows and Mac?
Answer: Yes, GEDCOM files are platform-independent and work on both Windows and Mac versions of Family Tree Maker. The process may look slightly different, but the file itself remains fully compatible.
7. What should I do if the GEDCOM import fails in FTM 2024?
Answer: First, try importing again with a different character encoding. If the issue continues, check the file for errors or contact FTM supports for assistance.
8. Do I need to check my data after importing a GEDCOM file?
Answer: Yes, always review your tree after import. Some programs interpret GEDCOM data differently, which can lead to missing details, formatting issues, or incorrect relationships that need manual correction.